Are you tired of the same old lunch options? Looking for a delicious and healthy alternative that's both satisfying and versatile?
Look no further than brown rice onigiri! These delectable brown rice balls are not only nutritious but also incredibly customizable, making them the perfect meal or snack for any time of day.
What is Onigiri?
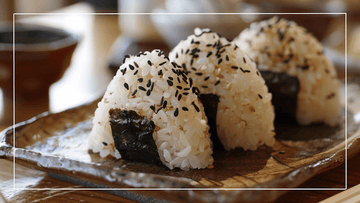
Onigiri, often referred to as rice balls or rice triangles, is a beloved staple in Japanese cuisine. This food was traditionally eaten by travelers because it was easy to carry and travel with but now has grown in popularity and are sold in convenience stores and restaurants.
The word onigiri comes from the word nigiru, which means to "to grasp" or "to hold" in Japanese, reflecting the way the rice is typically shaped by hand.
Onigiri typically consists of Japanese white rice wrapped in seaweed and filled with various ingredients like salmon, tuna, or pickled plums.
However, by substituting white rice with brown rice, you can boost the nutritional value of your onigiri while adding a nutty flavor and satisfying chewiness.
Benefits to Switching to Brown Rice

Typically, onigiri is made with the same type of rice as sushi, a short-grain Japanese white rice. However, a medium-grain Japonica brown rice is great because it also has a sticky texture when cooked, which helps the rice hold its shape when forming your brown rice onigiri.
Not only is brown rice a delicious alternative but a healthier one. Brown rice is a whole grain that's packed with essential nutrients such as fiber, vitamins, and minerals.
Unlike white rice, which has been stripped of its bran and germ during milling, brown rice retains its nutritious outer layers, making it a healthier choice for your diet.
Incorporating brown rice into your meals can help promote better digestion, regulate blood sugar levels, and support overall heart health. Brown rice will also keep you full longer, making brown rice onigiri a great snack or lunch that will get you through the day.
Steps To Forming Onigiri
Before you start forming your onigiri brown rice balls you will need to follow a few steps:

Warm Rice
The first step is to make sure you are using warm rice. Freshly cooked rice that has cooled down but is still warm is the best when forming onigiri. The warm rice helps the rice form and stick together.
Wet/Salt Your Hands
Next, make sure your hands are dipped in water that has been seasoned with salt. The water will help form the rice and keep it from sticking to your hands, and the salt will flavor the rice as you shape your brown rice onigiri.
Forming the Rice
The triangle shape is one of the reasons onigiri is so special and recognizable. You can create this shape by cupping your hands in a “C” shape and apply pressure to the sides. Flip the rice and continue shaping until you reach the triangle shape.
Adding Nori Sheets
After forming the rice, take a strip of nori and wrap it around the triangle. Use water to help the nori stick better.
Adding Filling
To add a filling to your brown rice onigiri you will take 2/3 of your rice and gather it in your hand. Make a small indent in your rice and add your desired filling. After, take the rest of your rice and cover the hole. Using your hands, start molding the rice in the triangle shape, while making sure the filling is sealed.
The classic version of this dish with no filling is naturally a vegetarian onigiri dish. However, you can spice it up with furikake seasoning, which is a naturally vegan and gluten free Japanese seasoning. You could also add pickled veggies or cooked veggies for your vegetarian onigiri.
Now that you know the tips and tricks to make the perfect brown rice onigiri, try our twist on a classic! Feel free to add your favorite ingredients and make this brown rice onigiri recipe unique to you!

Recipe: Brown Rice Onigiri
Cook Time: 55 minutes
Assemble Time: 20 minutes
Total Time: 1 hour and 15 minutes
Servings: 10 Pieces
In this recipe we will be using our Chico Rice Brown Milled California Japonica Rice.
What You Will Need
- 2 cups cooked brown rice
- ½ teaspoon kosher salt
- 4 cups of water (for cooking the rice)
- 1 cup of water (for forming the onigiri)
- Optional - Fillings of your choice (e.g., salmon, avocado, cucumber, pickled vegetables)
- Nori sheets
Cooking Instructions
- Rinse 2 cups of Chico Rice Brown Milled California Japonica Rice until the water runs clear.
- Add the rinsed rice to 4 cups of gently boiling water in a medium saucepan with a tight lid.
- If you are using a rice cooker, follow these linked cooking instructions.
- Simmer on low heat for 40 minutes without lifting the lid.
- Remove the saucepan from heat, keep it covered, and let the rice stand for an additional 5 minutes.
- Uncover rice and let sit for an additional 10 minutes until the rice is done steaming but is still warm.
Assembly Instructions:
- Set aside a bowl of 1 cup of water and a bowl of kosher salt.
- Use the water to wet your hands and then take a small pinch of salt and rub it on your hands.
- With your wet hands take a handful of the cooked warm brown rice.
- Optional – If you want filling added, grab 2/3 of your rice in your palm, put the filling in the center of the rice and use the other 1/3 of rice to cover the filling.
- Start shaping the rice into a triangle, and if you have filling make sure the filling is completely enclosed.
- Repeat with the remaining rice.
- Take your strips of nori and wrap it around the onigiri. To make the strips easier to use, cut them in uniform strips that will fit your onigiri.
- Enjoy!
Brown Rice Twist on a Classic Dish
Brown rice onigiri offers a delicious and nutritious alternative to traditional white rice, providing a wholesome base for a variety of fillings and flavors. Whether you're craving a classic combination or looking to experiment with new ingredients, these recipes are sure to satisfy your taste buds while promoting healthy eating. Give them a try and discover the joy of homemade brown rice onigiri!
